Interface Tables:
- RCV_TRANSACTIONS_INTERFACE
- RCV_HEADERS_INTERFACE
- PO_INTERFACE_ERRORS (Error Table)
Base Tables:
- RCV_SHIPMENT_HEADERS
- RCV_SHIPMENT_LINES
- RCV_TRANSACTIONS
Concurrent Program:
- Receiving Transaction Processor
Interface Tables:
Base Tables:
Concurrent Program:
Interface Tables:
Base Tables:
Concurrent Program:
Interface Tables:
Base Tables:
Concurrent Program:
1. Check the status of WF Notification Mailer:
SELECT component_name,component_status
FROM fnd_svc_components
WHERE component_type = ‘WF_MAILER’
2. Check the count of unsent notification:
SELECT message_type,COUNT(*)
FROM wf_notifications
WHERE status=’OPEN’ AND mail_status = ‘MAIL’
GROUP BY message_type
3. Check the Notification Mailer Setups:
SELECT p.parameter_id, p.parameter_name, v.parameter_value value
FROM fnd_svc_comp_param_vals_v v, fnd_svc_comp_params_b p, fnd_svc_components c
WHERE c.component_type = ‘WF_MAILER’
AND v.component_id = c.component_id
AND v.parameter_id = p.parameter_id
AND p.parameter_name in (‘OUTBOUND_SERVER’, ‘INBOUND_SERVER’,
‘ACCOUNT’, ‘FROM’, ‘NODENAME’, ‘REPLYTO’,’DISCARD’ ,’PROCESS’,’INBOX’)
Two Mandatory Out Parameters which procedures of Package used by Concurrent Program should have are:
1.Errbuf=>Gives the error message which can be written into the Log
2.Retcode=>Gives the status of Concurrent program
1. Navigate to System Administrator->Profile-> System and set “LE: Generate Legal Entity Identifier” profile as Yes at user level
2. Navigate to: General Ledger Super User->Setup->Financials->Accounting Setup Manager-> Accounting Setups
3 . Click on “Create Accounting setups” and then either create Legal Entity or add Legal entity by clicking “Add Another Row”

Also click on “Create New Address” and then next button
 4. Enter the Ledger details and click next button

COA=>GOVTEST_ACCOUNTING_FLEXFIELD
Calendar=>GOVTEST_CAL
Currency=>USD
SLA Method=>Standard Accrual (Oracle Seeded)
 5. Navigate to: General Ledger Super User->Setup->Financials->Accounting Setup Manager-> Accounting Setups and search with newly created Ledger
6. Then click “Update Balancing Segment Values” button.

7. Enter the balancing segments and click on apply.

8. Now click on Update button across “Ledger Options”


Click next and submit.


9. Click update against Operating Units and then create OU by clicking on Add Operating Unit Button.

10. Navigate to System Administrator-> Security->Responsibility-Define and create new GL Super User Responsibility

11. Navigate to System Administrator->Profile-> System and assign below profiles for the newly create responsibility
MO: Operating Unit=>GOVTEST_ORG
GL Ledger Name=>GOVTEST_LEDGER

12. Navigate to newly created GL Super user responsibility
GOVTEST General Ledger Super User->Setup->Accounts->Combinations and create the GL Code Combinations

Calendar:
1. Navigate to: General Ledger Super User->Setup->Financials->Calendars->Types and define the Calendar Type

2. Navigate to: General Ledger Super User->Setup->Financials->Calendars->Accounting and define the calendar.

Currency:
1. Navigate to: General Ledger Super User->Setup->Currencies->Define and define the currency

Ensure the currency is enabled
2. Navigate to: General Ledger Super User->Setup->Currencies->Rates->Types and define the currency conversion types

3. Navigate to: General Ledger Super User->Setup->Currencies->Rates->Daily and define the currency exchange rate for each day.

Chart of Account:
1. Navigate to: General Ledger Super User->Setup->Financials->Flexfields->Validation->Set and define all the segment value sets.

Similarly defined value sets for other segments also-GOVTEST_COST_CENTER, GOVTEST_ACCOUNT, GOVTEST_SUB_ACCOUNT and GOVTEST_PRODUCT
2. Navigate to: General Ledger Super User->Setup->Financials->Flexfields->Validation->Values and define segment values.Also fill segment qualifiers value in Values,Hierarchy,qualifiers Tab.


For the account that is to be set as the Retained Earning Account,select account type as “Ownership/Stockholder’s Equity“.For other accounts select type as Expense or Asset or other values
3. Navigate to: General Ledger Super User->Setup->Financials->Flexfields->Key->Segments
Query Application as “General Ledger” and Title as “Accounting Flexfield”.Then enter the new accounting structure code,title and description.Ensure Cross-Validation segments and Allow Dynamic Insert option is enabled.Also ensure the segment seperator is Period(.)
Then enter the segment details.Also select the Flexfield qualifiers for the segments.


Freeze the KFF once setups are completed
Cross-validation controls the combinations of values you can create when you enter values for key flexfields. A cross-validation rule defines whether a value of a particular segment can be combined with specific values of other segments. Cross-validation is different from segment validation(Security Rule), which controls the values you can enter for a particular segment.
Cross-validation rules have no effect on combinations that already exist when you define your cross-validation rules.Suppose you define a new cross-validation rule, but have existing entries in your combinations table that violate the rule. Since the existing combinations pre-date the rule, your flexfield continues to treat them as valid.When user tries to create a new combination that violates your new rule, your flexfield returns an error message and rejects the combination.
1. Navigate to General Ledger Super User->Setup->Financials->Flexfields->Key->Segments
2. Enter the Application,Flexfield title and flexfield code.Ensure Cross-Validate segments option is checked.

3. Navigate to General Ledger Super User->Setup->Financials->Flexfields->Key->Rules
4. Enter the Application,Flexfield title and flexfield code.Then enter the Cross-Validation Rule name,Error message and Error segment.Also Enter the Cross-Validation rule elements.

5. Navigate to General Ledger Super User->Setup->Accounts->Combination.The try combination entering a combination that violates the new rule,the error message will be displayed.

Security Rule allows restricting user access to various key flexfield segments list of value.
1. Enable security on the value set.To enable security for a value set, choose either Non-Hierarchical Security or Hierarchical Security for the Security Type.
With hierarchical security, a security rule that applies to a parent value also applies to its child values.
2. Navigate to System Administrator->Application->Flexfield->Key->Segments and query the Application,Title and Structure(Accounting flexfield structure)
3. Click on the segments button and after selecting the segment to which security rule is to be applied, click on open button.
4. Ensure that the “Security Enabled” check box is enabled.

5. Navigate to General Ledger Super User->Setup->Financials->Flexfields->Key->Security->Define
6. Query the Application,Title and Structure(Accounting flexfield structure).Then select the required Segment(Independent Segment)
7. Enter the Security Rule name,description and the error message that needs to be displayed.
8. Under security Rule Elements,select the segment values that needs to be included and excluded.By default all values will be excluded.From and To value can be selected same or a range(like From 100- To 300).Then save it.

9. Navigate to General Ledger Super User->Setup->Financials->Flexfields->Key->Security->Assign
10. Query the Application,Title and Structure(Accounting flexfield structure).Then select the required Segment(Independent Segment)
11. Select the application and responsibility to which security rule needs to be applied and set the Security Rule name under Security rules section.
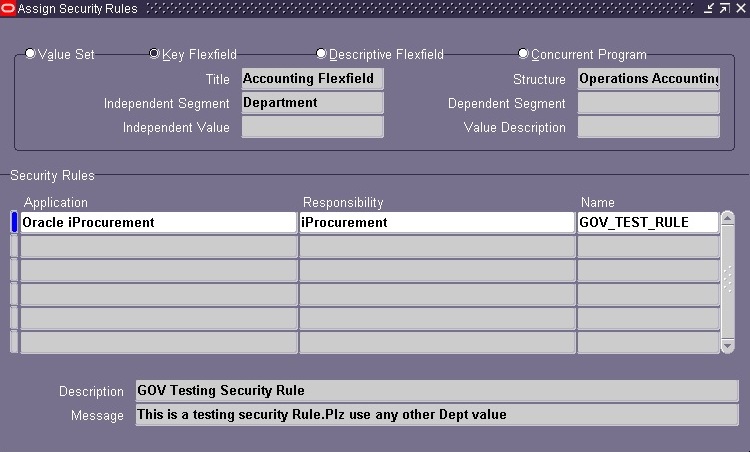
12. Navigate to Responsibility against which security rule is set and try entering the segment value for security rule was set.
In above example,try navigating to iProcurement responsibility and try entering charge account.
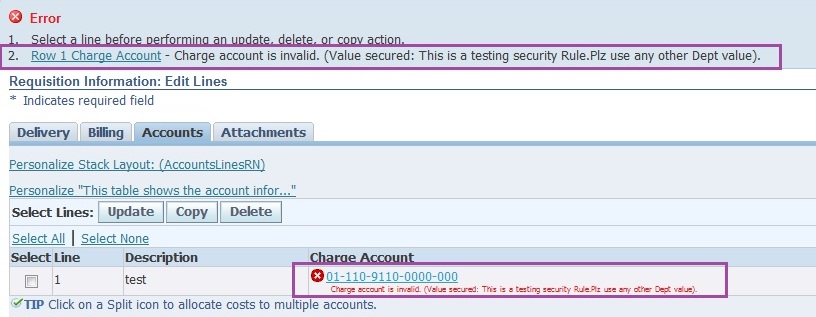


It will allow to enter only values that are included for that segment.For others it will show the error message which we have set.
Profiles:

It will be reflecting once you re-login

